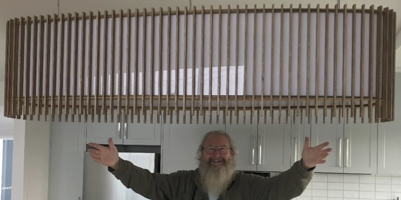
“Can you build us a Statement Lamp?”
The question came from a local couple for whom I was building a Jarrah dining table to seat 8.
My first reaction was “What is a Statement Lamp?” A quick look on the internet told me that they can take many forms. But they were all BIG, and hung from the ceiling, and were wired to mains electricity.
I should have said “No”.
But my interest was piqued, so I said we could talk about it.
I should have said “No”.
Three planning sessions later, I had the brief and some concept sketches.
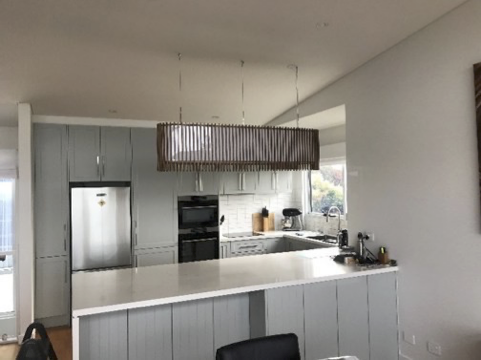
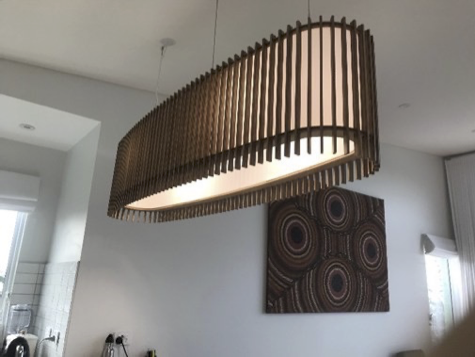
An Ovoid shape 1600 mm long, 400mm at its widest coming down to a 150 radius at the ends, 400mm high, 2 horizontal 12 – 16mm plywood frames 50 mm wide, joined vertically by slats 18mmx7mm, (also plywood), Perspex as a diffuser inside the slats, the top frame to accommodate 2 led bunker style lights and to have 3 hanging brackets to be attached to the ceiling joists and in the centre of the kitchen bench top.
I should have said “No”.
But I had the concessions that his electrician would wire the lights up when I had the top frame ready and do the final wiring in, and his builder would attach the fixing points on the ceiling and provide exact measurements so that I could place the brackets on the frame. He would also provide the lights and hanging brackets.
So, simple enough, make some drawings, source and cost out the materials, cut it out and build it, – what could go wrong?
To make the ovoid shape I needed to put two radii tangent to two 300mm diameter end circles and also tangent to a 400 mm diameter circle halfway between them. The maths is astonishing, I was in the ballpark, but the solution eluded me. I tried drawing to scale on the drawing board, but too many inaccuracies. The only solution was a CAD program.
Mainly through trial and error, that radius turned out to be 4395mm. Then there was the inner edge to be marked and cut exactly 50mm inside that.
The only way this job was going to be cut out accurately was to do complete drawings of the two separate frames in CAD and export them to a CNC cutter. Another learning experience.
I should have said “No”.
I did some research to find the plywood. I found the perfect structural ply in Sydney Blue Gum. I rang a couple of times with my order, 1 sheet 15mm and 1 sheet 18mm, “we’ll get back to you”, but had no calls back. I went down to the supplier and asked at the counter. The sales person couldn’t find it on their stock list. I showed them on their website. They then asked someone else. “oh, no mate, I think you have to buy 5 sheets minimum of each size”.
I had to settle for the premium hardwood ply from the big green shed, which is not the best.
Perspex for the diffuser? “White opal is the only thing you will get in that size, 2mm will bend to the curve you want” Ok order a sheet. “The order went in last week; you will have to wait till next month unless you want to pay for a courier for 1 sheet.” How much? – I’ll wait.
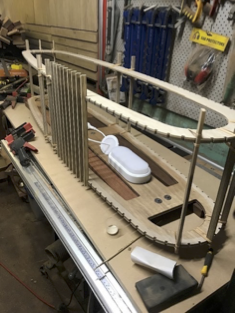
CNC does a fine job of cutting out, far better than me marking out with a pencil, compass and springy wooden strips, then trying to cut freehand and plane, file and sand the shape, easing it into what it should be and perfectly matching the 2 frames. One headache less. The Perspex arrived and had 2 lengths factory cut to 300mm wide (and it was 300!).
Next was to mark and cut the 112 half lap joints in the frame for the slats. Each join had to be cut so that it was at 90 degrees to the tangent of the curve at that particular point. I had to make a couple of jigs to mark out and rout them in the sides which were twinned for this step so each slat would finish perpendicular.
I should have said “No”.
When done, I fitted the lights and brackets on the top frame, then removed them and sprayed that area with 2 coats of pre-cat lacquer and fitted them back on for the electrician to work his magic. (But I did notice a screwdriver mark in the frame next to one of the light fittings. No wonder they didn’t want him to wire up after the lamp was finished).
The slats were the easiest part to make. I cut the 18mm ply into 400mm long panels, ran a dado for the halving joints top and bottom allowing 300.5mm between them and slicing off 8mm strips. These were thickness sanded to 7mm final width.
After all this, and when everything was sanded and ready, the 4.5hr glue-up was, to say the least, tense and exhausting, but went well.
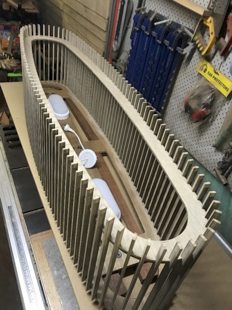
A clean up and detail of the finished frame, lights and brackets masked off, 2 coats of Pre-cat lacquer and then left to fully dry over a few days.
The Perspex had to be cut to 2 lengths so that the tight curve was in their centre and they could butt together behind a slat on each side. Not without its difficulties I can tell you. A couple of retaining screws to hold them in place and the build was done.
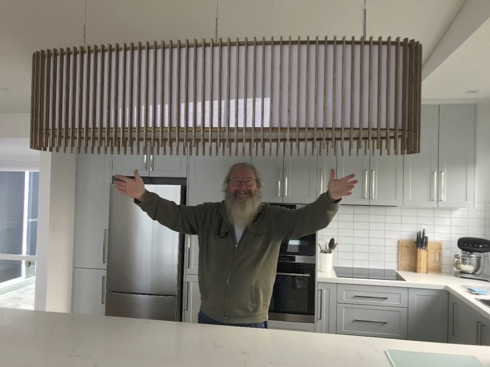
I delivered it to the excited recipients, helped lift it into position, and told them I should have said “No”, but at least I can now say “Been there, done that!”.