For years I’ve wanted a good solid workbench but never had the time to take it on. Firstly I didn’t have a clue what the key components of a good workbench were. What do you make it out of? How much is it going to cost? It’s got to be heavy – don’t want it or what’s on top to bounce. How do I make it to last at least as long as me?
I thought a good place to start would be to buy a book on workbenches, so I purchased “Workbenches” by Christopher Schwartz.
I found it a very useful book, in it he discusses the basics of design and matching features to functions, with plenty of practical tips. The book also contains plans for several different benches. It took some time to go through the book, several times, each time taking notes on features that I thought would be useful. So I had a list of must haves and nice to haves and that was refined over the year or so that it lived in the lounge room.
I began to settle on a modified version of a French bench called a Roubo. It has a front and tail vise, 2400mm long and 700mm width. The height I fa- voured was 870mm (34″) which was the same as my old bench. I placed dog holes in the top for both vises and two rows of holes at the back of the bench for hold downs. I also included a ‘deadman’ at the front as I’d often had the need for one on my old bench. For planing stops I will use the dog holes and opted not to have a tool/shavings tray as I thought it would be not be so useful and preferred more flat space on top. One thing I included that I’ve never seen on a bench before was a set of ‘outriggers’ on the back of the bench to assist in cutting full sheets (2400mm) of ply. I’ve made a few very big book cases over the last few years and this outrigger would have been a simple way of helping cut full length sheets. See photo later on.

I visited the Japanese tool shop in Kogarah a few times. They have an old workbench in there made from strips of plywood glued together. I liked the look of it and also thought it could be a cost effective way of making a bench with as thick a top as I liked, ‘no bounce’.
In October last year my wife, knowing plans were afoot, offered to buy me a tail vise for my birthday, which was the following month. Not wanting to dis- appoint her I said yes please. So this is when the plan started to come together.
Referring to my book and list I settled on the design and that it was to be made from plywood strips. I calculated I needed six sheets (2400 x 1200) of 18mm ply at a bench top thickness of 125mm, hoping for a 120mm finished thickness. Wasn’t sure how much glue I needed so I just bought a big bottle of Titebond 111. I ended up using a gallon, after several visits to the shop.
First job was to cut the ply into 40 strips 125mm wide. This would give me a finished bench width of 720mm. Length ended up just under 2400mm. I put 4 x 10mm biscuits in the strips near what would be the top of the bench.


This would help align the strips and reduce waste and work, as there would not be too much to shave off when finished. The legs and rails were also made of ply strips. The legs were made up of 6 strips 125mm wide and the rails 4 strips 75mm wide.
Next step was to glue the strips into bundles of 5. The end bundles were sets of 4, saving the outer strips which were to be glued on after the top was assembled.
Before beginning the gluing process I clamped the front bundles together and marked out the vise position on the underside of the bench. Knowing I needed 75mm of bench thickness between the base of the bench and the bench top I cut out the base to accommodate the vise.
So I had 8 bundles of ply to glue together, excluding the outer pieces. For extra strength I drilled through the bundles and installed 5 booker rods during the gluing process.
This was a bit tricky because no matter how hard you try stuff doesn’t exactly line up, so, after marking the positions of the rods on the dry fit, as I glued the first two bundles I drilled through both to make sure holes aligned. I repeated this for the remaining bundles and recessed the end strips so the rods and nuts didn’t protrude.
After the glue was set I trimmed the rods and glued the face strips of ply to the sides of the bench. Legs and rails were also strips of ply glued together.
Third step was to trim the underside of the top. Weighing just over 100kg the bench top was carefully manoeuvred onto trestles and levelled. It was planned to use a sled and router with a trimming bit to ‘shave’ the surface flat. And then do the same to the top side. I’ve seen it work on YouTube so it must be right? Setting up the rails for the sled to run on is an important step. Knowing the bench top is as level as you can get it is the first step.
Then setting up your router rails to be level and just above the base of the bench is the next important task.
When this is done it’s all easy, once you’ve built a sled to fit you router and span your bench. I purchased a 50mm Torquata spoilboard surfacing router bit to do the trimming. It worked very well providing you kept to shallow passes.
Starting at the highest point, the router was slid back and forth until there was no contact between bit and bench. The bit was then lowered slightly and the process repeated until a completely level underside was achieved.
The same process was used for the top later on.


It was time to fit the legs and rails. Mortise and tenon joints were used, together with dowels and slightly offset holes to make the joints nice and tight when the dowels were driven home. I glued all joints too. I used 3/8″ dowels as they haven’t entered the decimal age yet.
While I had the bench upside down and legs installed I fitted castors for ease of repositioning. They pop up when not required leaving a solid, stable bench. The underside, legs and rails were all coated with linseed oil before flipping over.


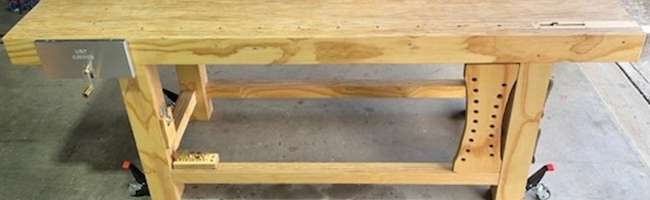
Once the bench was right side up the top was trimmed flat and the ends cut square. The front vise was then fitted in its recess. The fit was perfect, just below the top of the bench. A row of dog holes were then drilled across the top in front of the vise. The tail vise was then cut out and fitted and a cover cut to fit over the top of it. A slot was cut through the bench top below the vise so shavings and dirt can fall through and not clog the vise. A set of dog holes were then drilled along the bench in front of the vise. Both sets of dog holes were spaced to match the travel of the vises. Two rows of hold down holes were drilled across the back of the top.


So with the bench finished, the last job was to cut and fit the outriggers. The gap between the outrigger and bench side was 120mm. The horizontal arm is fixed to the leg of the bench and the support arms are stored on the back rail so they are handy when required. The top was coated with two coats of linseed oil.


So that’s the bench finished. Having used it now for a few months it satisfies all my needs so far, both vises work better than expected (I was used to an old and difficult one), it’s solid, no bounce, which I love, the overhang at the end of the bench is great for jobs where you can sit close to side and fiddle with a piece of wood, very comfortable.
The length is also a bonus, not only for full sheets of ply but for storing work when you have a few jobs on the go.